Want to start crocheting but have no clue where to begin? Don’t worry—you’re not alone!
Many beginners find their fingers getting tangled and yarn balls rolling everywhere when they pick up their first crochet hook. In fact, crocheting is just like learning to ride a bike—once you get the hang of the balance (that is, the feel of holding the hook and casting on), you’ll never forget how to do it.
Today, we’ll walk you through the first milestone of your crocheting journey with the simplest steps: the basic Chain Stitch. In just 5 minutes, you’ll be able to create your very first perfect “little tail”!
I. Preparation Tools (Must-See for Beginners, Minimalist & No Mistakes)
Beginners don’t need fancy, complicated gear to get started—just 2 essential items are enough to avoid wasting money on unnecessary tools:
- Crochet Hook: We recommend a 3.0mm-4.0mm hook (the most beginner-friendly size, with a moderate thickness, comfortable grip, and no sharp points to prick your hands);
- Yarn: Opt for worsted weight cotton yarn or milk cotton (it’s soft, hard-wearing, and forgiving for mistakes; light colors are best to help you see your stitches clearly).

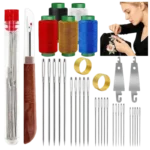
Perfect Tool Set for Crochet Beginners (No More Worrying About What to Buy!)
Need a hassle-free beginner tool set? —perfect for your first crocheting practice!
II. Core First Step: Hold the Crochet Hook Correctly (2 Methods, Choose the One That Feels Comfortable)
There’s no “one-size-fits-all” way to hold a crochet hook. The key is to hold it steadily and move it smoothly. Beginners can try both methods below to find the posture that feels most comfortable, so you won’t get hand soreness from long periods of crocheting.
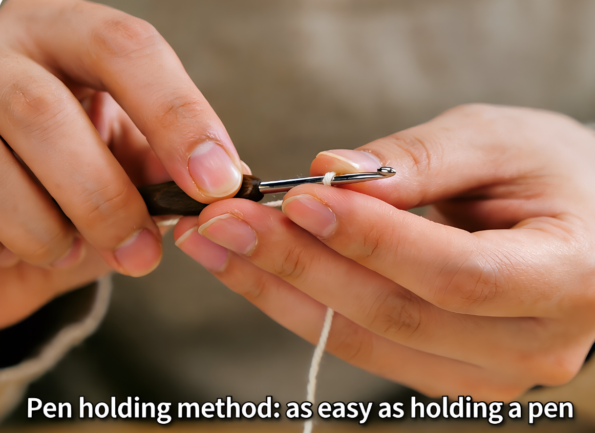
Method 1: Pen Hold Method (Most Recommended, Easy for Beginners)
This method is almost identical to how you hold a pen to write—super easy to pick up! It’s great for small, delicate stitches, detailed projects, and people with smaller hands.
- Pinch the middle of the hook handle with your index finger and thumb, with the hook tip facing forward (at a 45° angle to the tabletop);
- Bend your middle finger naturally and rest it gently on the hook handle to help steady it; let your ring finger and little finger relax comfortably against your palm;
- When working, use your fingers to turn the hook (not your wrist) to avoid tiring out your wrist.
Method 2: Knife Hold Method (Suitable for Thick Yarn, Fast Crocheting, Easier to Exert Force)
This method is similar to holding a knife to chop vegetables—it gives you more leverage, making it perfect for thick hooks, thick yarn, and faster crocheting. It’s ideal for people with larger hands.
- Rest the crochet hook in the palm of your hand, clamp the hook handle between your index and middle fingers, and point the hook tip outward;
- Place your thumb on top of the hook handle to press and steady it; bend your ring finger and little finger naturally against the outside of your palm;
- When working, turn the hook with your wrist to guide the tip through the yarn—this movement feels more relaxed and natural.
| Novice Tip: Give both methods a try—hold each posture for 1 minute to see which one feels more natural. Most beginners prefer the pen hold method at first, and you can switch to the knife hold later as you get more comfortable. Don’t grip the hook too tightly; keep your fingers relaxed to avoid hand stiffness during long crocheting sessions. |
Comfortable Grip Hook for Beginners (Say Goodbye to Hand Soreness!)
Still struggling with a comfortable grip? Try our beginner-friendly crochet hook with a non-slip handle—make holding the hook as easy as holding a pen! Click here to check it out.
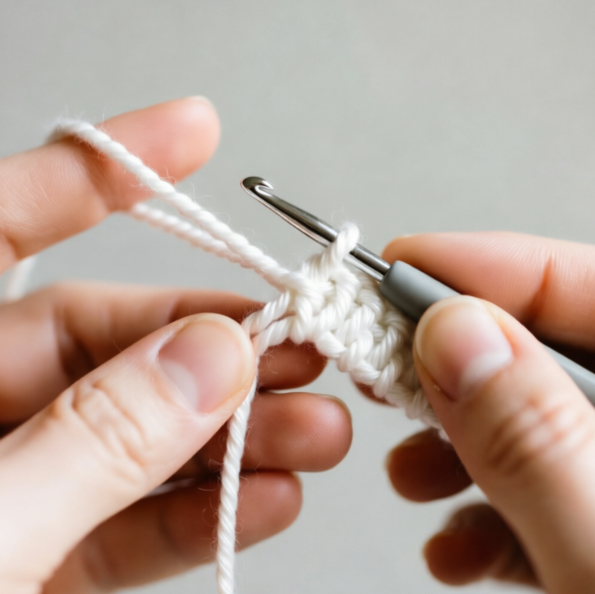
III. Master Basic Chain Stitch (CH) in 5 Minutes
The chain stitch is the “building block” of crocheting. It’s used to cast on for every crocheted project, serving as the “foundation.” Mastering this step means you’ve completed 80% of your crocheting journey! The steps are simple, and you’ll get the hang of it after just 3-5 practice tries.
Step 1: Cast On (Fix the Yarn, Get Ready)
- Place the yarn in your palm, leaving a 10cm tail (you’ll use this to hide the yarn later);
- Pinch the tail and the main yarn with your thumb and index finger to form a loop (don’t pull it too tight—leave a small gap so the hook can easily pass through);
- Pass the hook tip (no matter which holding method you’re using) through the inside of the loop, with the tip facing you.

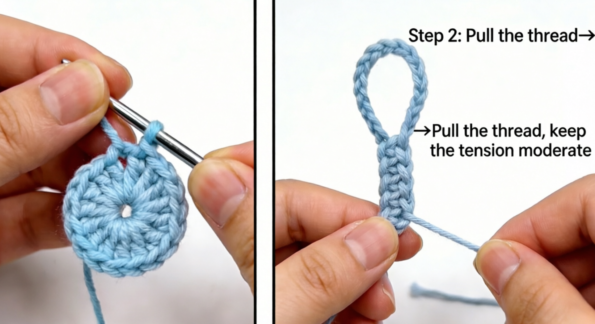
Step 2: Hook the Yarn (Form the First Chain Stitch)
- Once the hook is through the loop, use the tip to hook the yarn outside the loop (note: “hook” it, don’t pierce through the yarn);
- Gently pull the hook to bring the hooked yarn through the loop—you’ll now have a new small loop on the hook;
- Don’t pull it too tight—let the loop slide easily on the hook (too tight and you won’t be able to move the hook; too loose and the yarn will slip off. Aim for a tension that lets you turn the hook smoothly);
- That’s it—you’ve made your first chain stitch!
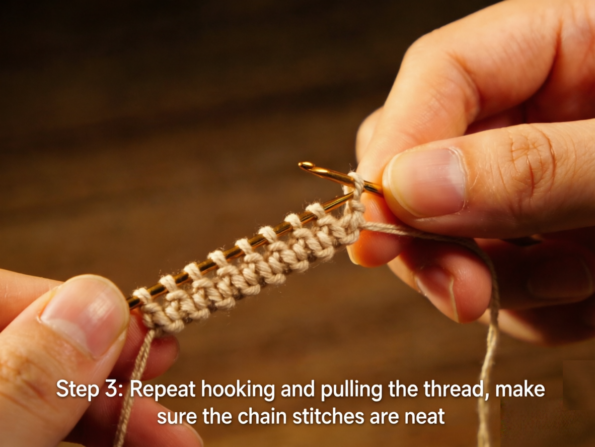
Step 3: Repeat Crocheting to Complete a String of Chain Stitches
- Keep the loop on the hook in place, then use the tip to hook the yarn again (just like Step 2, hook the yarn outside the loop);
- Pull the hook to bring the yarn through the loop on the hook—this makes your second chain stitch;
- Repeat the “hook the yarn → pull the yarn” motion—each repetition makes one chain stitch. Crochet slowly, and you’ll soon have a neat row of chain stitches;
- When you’ve crocheted to your desired length, stop and get ready to finish off.
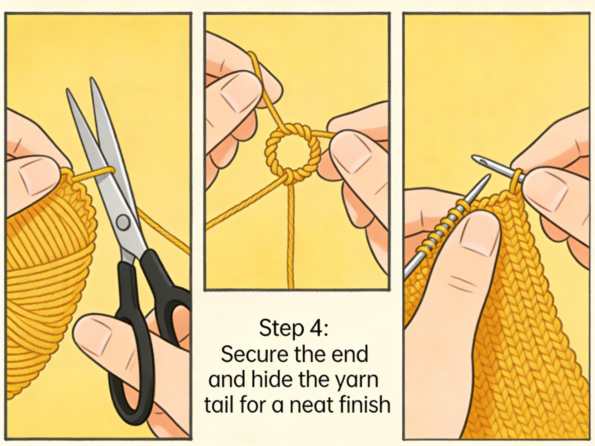
Step 4: Finish Off (Fix the Loop, Avoid Yarn Slippage)
- When you’ve reached your desired length, there will be one loop left on the hook;
- Cut the yarn with scissors, leaving a 10cm tail;
- Thread the tail through the loop on the hook and pull gently—the loop will lock in place, so the yarn won’t slip off;
- Finally, hide the tail in the chain stitches (use the hook tip to tuck the tail into an adjacent stitch) and trim off any excess yarn.
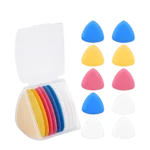
All-in-One Beginner Crochet Kit (Keep Practicing Easily!)
You’ve mastered the chain stitch! Get your complete beginner kit (crochet hook + yarn + small scissors) to keep practicing—click here to grab yours and keep improving.
IV. Common Mistakes & Pro Tips for Beginners (Avoid Pitfalls, Improve Fast)
- Common Mistake 1: Uneven chain stitch tension → Remember the “sliding loop” rule—keep the tension of each chain stitch consistent, and your finished work will look neat and even;
- Common Mistake 2: Gripping the hook too tightly → Relax your fingers when holding the hook. Use your fingers (for the pen hold method) or wrist (for the knife hold method) to apply force—this prevents hand soreness and stiff stitches;
- Common Mistake 3: Leaving the tail too short → Always leave at least a 10cm tail when casting on and finishing off—shorter tails are hard to hide and can cause the yarn to slip;
- Pro Tip 1: Count your stitches while practicing—start with 10 or 20 chain stitches to get into a steady rhythm;
- Pro Tip 2: If the loop is too loose, gently tighten it as you pull the yarn; if it’s too tight, give the hook a light tug to adjust the loop size;
- Pro Tip 3: Practice for 5 minutes every day—after 3 days, you’ll be able to hold the hook and make chain stitches smoothly. Learning other stitches later will be a breeze!
Avoid uneven stitches and broken yarn! Our high-tolerance milk cotton is soft, durable, and easy to see—perfect for beginners. Click here to choose your favorite light color.
V. Summary: Getting Started Is Not Difficult, Practice Is the Key
Today, we covered the two core basics of crocheting: the two ways to hold a crochet hook (pen hold and knife hold) and the basic chain stitch. It’s not as hard as it looks—all you need is to find a comfortable holding method and practice regularly. The chain stitch is the foundation of every crocheted project; later, we’ll learn stitches like single crochet and half double crochet, which all build on the chain stitch.
Beginners, don’t rush! Spend 5 minutes practicing each day, and you’ll gradually get the feel for it. You’ll soon discover the joy of crocheting—with just one hook and a ball of yarn, you can create endless possibilities. In our next issue, we’ll learn how to make your first small project (like a tiny bookmark) using chain stitches and single crochet. Don’t forget to follow along!
Beginner Small Project Kit (Start Your First Work Now!)
Ready to make your first small project? Click here to get our bookmark material kit—match your newly learned chain stitches and take your crocheting to the next level!